
How to Interpret a Soil Test
 By Justin Keay
[This article first appeared in The Gateway Gardener Winter 2019 issue and is part of a 3-part series on how to take a soil sample, receive a test report, and how to understand it and fertilize properly. Links to the other articles in the series can be found at the end of this article.]
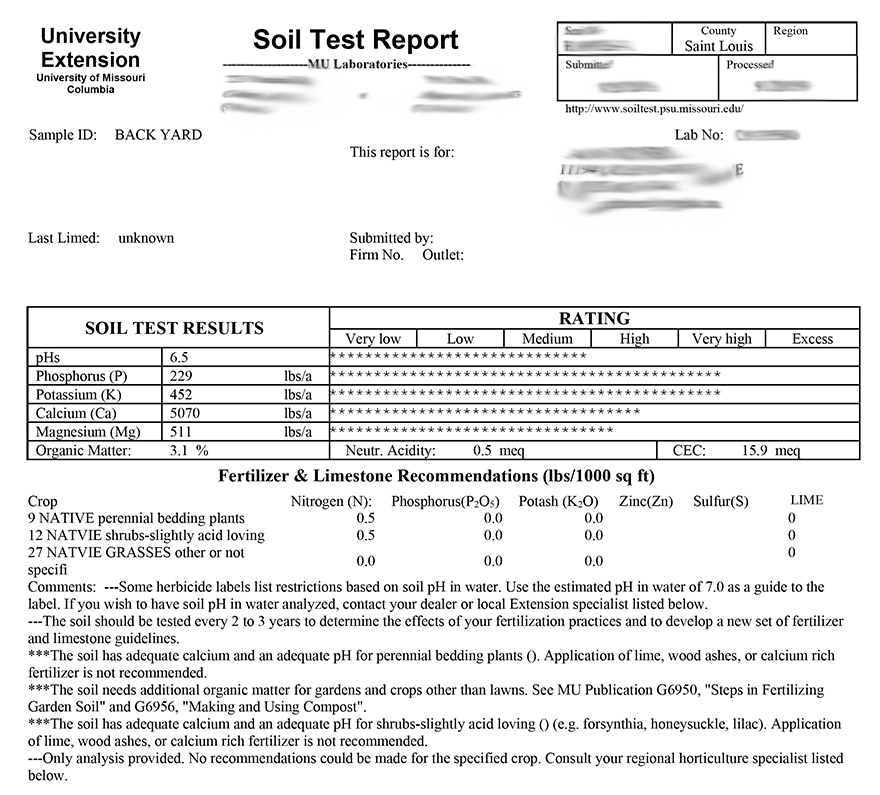
Having your soil tested regularly is an important part of growing healthy turf, garden ornamentals, and vegetable and fruit crops. The first step to learning about your soil is to take a soil sample. Once you submit a sample to your local extension office, you’ll receive a lab analysis. The above image is an example of the soil test results you will receive. The left column of the table lists the pH value of your soil, the lbs./acre of phosphorous, potassium, calcium, magnesium as well as the percentage of organic matter. The “Rating” part of the table gives you an idea of the relative value of nutrients and pH in your soil. The bottom row of this table also lists neutralizable acidity and CEC, or cation exchange capacity. These two terms will be explored in detail in a future article.
Soil Test Report Overview
Below the table, you will see the heading “Fertilizer & Limestone Recommendations”. Underneath this heading and on the left hand side you will see the crop selected, which in this case is perennial bedding plants. If you submit a soil sample, you will be able to select up to three different crops, and for all three you will receive specific fertilizer recommendations, as well as pH adjustment recommendations if necessary. The numbers to the right of the selected crop will tell you what you need to add to your soil to support optimal plant growth. The recommendations for macronutrients and lime are listed in pounds per 1000 square feet.
Underneath the fertilizer and limestone recommendations section of the soil test report, you will find a comments section that provides additional information to guide soil management. The comments will tell you how often to test your soil, if you need to adjust pH and what to use to adjust it, as well as if you need to add additional organic matter to the soil. You will often see MU Extension publications listed in this section. The suggested publications are specific to the needs of the soil sample submitted and are helpful in guiding soil management practices.
Examining the Soil Test Results
The pH of 6.5 found in the above example, is within an acceptable range for the selected crop (native perennials), therefor the recommendation for this soil is to add no lime. In circumstances where your pH is too low, i.e. too acidic, for the crop selected, lime will be recommended to raise the soil pH. If the crop selected was blueberries (an acid-loving crop), and the soil pH was too high, the soil test would give recommendations to add sulfur, which is used to lower soil pH.
You will notice in the above results that both phosphorous and potassium are listed in the very high range. This is a very common occurrence in urban landscapes. High levels of both phosphorous and potassium are often an indication that a homeowner has used a complete fertilizer, such as 12-12-12, on an annual basis. Plants require more nitrogen for growth than phosphorous or potassium, therefore using a complete fertilizer (with equal amounts of N-P-K) year after year will cause both phosphorous and potassium to build up to high or even excessive levels in soils. Calcium and magnesium are also both at high levels in the test results above. Because the results show that phosphorous, potassium, calcium, and magnesium levels are all high or very high, the recommendation is not to add any of these macronutrients to the soil.
The organic matter listed in these results is 3.1%. This level or organic matter would be acceptable for lawns, but not for any other type of crop. The comments section of the report notes that the soil needs additional organic matter and provides the titles of several helpful MU publications. The listed publications will guide you in the steps necessary to increase organic matter levels in the soil.
After you’ve reviewed the test, it’s time to apply it…literally. The article below discusses how to buy the right fertilizer based upon your test information, and how much of it to apply. Or you can go back to the beginning and read about soil testing or review your our soil chemistry primer.
How to Choose and Apply an Appropriate Fertilizer
How, Why and When to Test Your Soil
Justin Keay is the MU Extensio Field Specialist in Horticulture for St. Louis City/County and St. Charles County.